The rice should hold together when you scoop it, but it shouldn’t turn into a dense, sticky slab under the salmon. Rinsing the short-grain rice well and seasoning it after cooking gives this Salmon Sushi Bake that lightly tangy, familiar sushi-rice base without rolling a single piece.
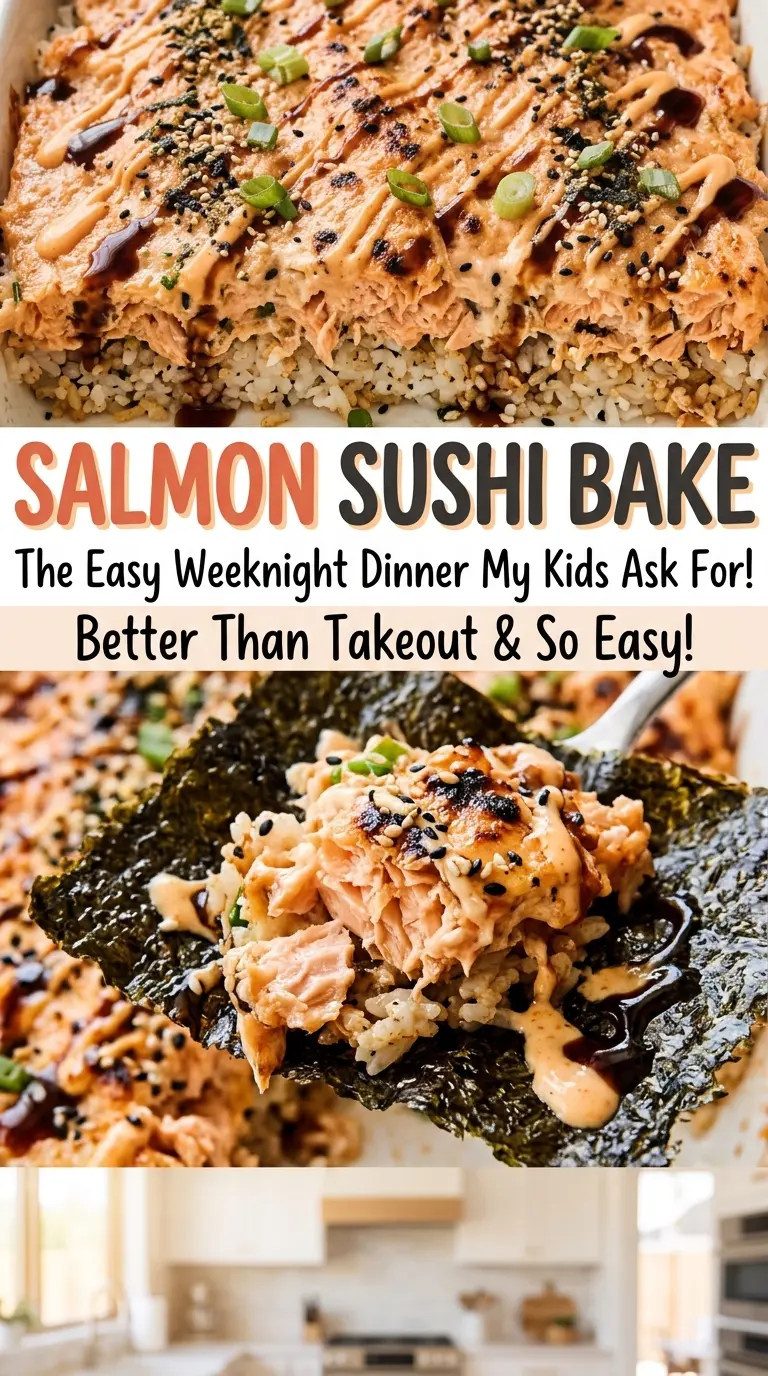
I like the contrast in every scoop: tender salmon coated in a creamy, lightly spicy sauce, a toasted layer of furikake, and cool cucumber alongside. The roasted seaweed sheets stay on the side so you can scoop up a bite just before eating. It’s relaxed to serve, but still has the savory-sweet balance that makes sushi rice so satisfying.

Kitchen Note
Stir the vinegar, sugar, and salt until the sugar and salt dissolve before folding the mixture into the rice. Then use a gentle folding motion; stirring hard breaks up the grains and makes the base gummy.
Save this Salmon Sushi Bake for its creamy salmon topping, tangy rice, and crisp seaweed scoops.
Why the Salmon Gets Baked Before It Goes Into the Dish
The salmon has two trips through the oven, but the second one isn’t meant to cook raw fish under a blanket of sauce. Baking the fillet first lets you check its doneness directly and flake it into large pieces. Once those flakes are mixed with the creamy sauce, the final bake warms the topping and brings the edges to a gentle bubble.
That order gives you more control over the texture. If you put raw salmon straight into the rice-and-sauce layers, you’d have a harder time judging whether the fish was cooked without disturbing the topping. Here, the salmon is ready before it meets the mayonnaise and cream cheese, and the rice stays a separate, scoopable layer beneath it. Keep the second bake focused on heating the assembled dish; leaving it in until the top looks deeply browned can dry out the salmon.
Short-Grain Rice, Creamy Salmon, and the Toppings That Complete Each Bite
- Short-grain white rice — Its plump grains turn pleasantly cohesive after cooking, which helps the base hold together when scooped with the salmon. Long-grain rice stays more separate and won’t give you the same sushi-style texture, so use short-grain here.
- Unseasoned rice vinegar, sugar, and kosher salt — Together, they season the rice with a mild sweet-tart edge rather than making it taste like plain steamed rice. Unseasoned vinegar gives you control over the balance; seasoned rice vinegar already contains seasoning, so it isn’t a direct swap if you keep all the sugar and salt.
- Skinless salmon fillet — A fillet flakes into substantial pieces that stay distinct in the creamy mixture. Fresh or fully thawed salmon works; having the pin bones removed makes the finished bake easier to scoop and eat.
- Mayonnaise and softened cream cheese — Mayonnaise keeps the salmon mixture creamy, while softened cream cheese helps it blend smoothly instead of leaving cold lumps. Regular versions work well here, and softening the cream cheese before mixing makes the biggest difference to the sauce’s texture.
- Sriracha and soy sauce — Sriracha brings chili heat and soy sauce supplies savory depth to the creamy topping. Furikake adds a salty, seaweed-rich finish across the surface, while cucumber and roasted seaweed snack sheets bring cool crunch and a crisp wrapper for each scoop.
Build the Rice Base and Salmon Topping Without Mushing Them Together
Rinse and Season the Rice
Rinse the rice in a fine-mesh strainer under cool water until the water runs mostly clear, then drain it well. Combine it with the water in a 3-quart saucepan and bring it to a boil over medium-high heat. Cover, reduce the heat to low, and cook for 15 minutes; remove the pan from the heat and let it stand covered for 10 minutes. Stir the vinegar, sugar, and salt until dissolved, then gently fold that mixture into the cooked rice.
Bake the Salmon Until It Flakes
Heat the oven to 400°F and put the salmon on a parchment-lined rimmed baking sheet. Bake for 12–15 minutes, checking the thickest part with an instant-read thermometer; it should reach 145°F. Thickness affects the timing, so use the temperature and a moist, opaque center as your cues rather than waiting for the edges to look dry. Let the salmon rest for 5 minutes before flaking it.
Mix a Smooth, Lightly Spicy Topping
While the salmon bakes, stir the mayonnaise, softened cream cheese, sriracha, and soy sauce together in a medium bowl until smooth. If you see small cream cheese lumps, keep stirring and press them against the side of the bowl rather than adding more liquid. Flake the rested salmon into the sauce and mix gently so the pieces stay recognizable. The finished mixture should coat the flakes without turning into a paste.
Layer and Bake Until the Edges Bubble
Lightly grease a 9×13-inch baking dish with the neutral oil and spread the seasoned rice evenly across the bottom. Add the salmon mixture on top, then sprinkle with furikake. Bake at 400°F for 10–15 minutes, until the filling is hot and bubbling around the edges. Serve warm with the thinly sliced cucumber and roasted seaweed snack sheets on the side.
Ways to Shift the Heat and Savory Notes
Turn Up the Sriracha
Stir additional sriracha into the mayonnaise and cream cheese mixture before adding the salmon. The topping gets hotter and a little sharper, while the creamy base keeps the heat from taking over each bite.
Make a Milder Salmon Layer
Leave the sriracha out of the sauce for a gentler, less spicy bake. The mayonnaise, cream cheese, and soy sauce still give the salmon a creamy, savory coating, though you’ll lose the chili tang.
Put More Furikake Into the Rice
Fold a little furikake through the seasoned rice before layering on the salmon, then keep the rest for the top. That spreads the savory seaweed seasoning through the base instead of concentrating all of it on the surface.
Storage and Reheating
- Refrigerator: Keep the salmon and rice in an airtight container for 3–4 days. The rice firms up and the salmon topping won’t be quite as soft; store cucumber and seaweed separately so they stay crisp.
- Freezer: Freeze portions of the baked rice and salmon, without cucumber or seaweed, in a freezer-safe airtight container for up to 2 months. Thaw in the refrigerator before reheating; the rice may be a little softer afterward.
- Reheating: Warm a portion in the microwave or in a 325°F oven until the center reaches 165°F. Reheat only the rice and salmon, then add the cucumber and seaweed at serving time so they don’t turn limp.
Questions That Come Up When Making Salmon Sushi Bake
Salmon Sushi Bake
Ingredients
Equipment
Method
- Rinse the rice in a fine-mesh strainer under cool water until the water runs mostly clear, then drain well.
- Combine the rice and water in a 3-quart saucepan and bring to a boil over medium-high heat.
- Cover, reduce the heat to low, and cook for 15 minutes.
- Remove from the heat and let stand covered for 10 minutes.
- Stir the rice vinegar, sugar, and salt together until dissolved.
- Gently fold the vinegar mixture into the cooked rice.
- Heat the oven to 400°F.
- Place the salmon on a parchment-lined rimmed baking sheet and bake for 12–15 minutes, until the thickest part reaches 145°F.
- While the salmon bakes, stir the mayonnaise, cream cheese, sriracha, and soy sauce together in a medium bowl until smooth.
- Let the salmon rest for 5 minutes.
- Flake the salmon into the bowl and gently mix with the sauce.
- Lightly grease a 9x13-inch baking dish with the neutral oil.
- Spread the seasoned rice evenly in the dish.
- Top with the salmon mixture and sprinkle with furikake.
- Bake at 400°F for 10–15 minutes, until the filling is hot and bubbling around the edges.
- Serve warm with the cucumber and roasted seaweed sheets.