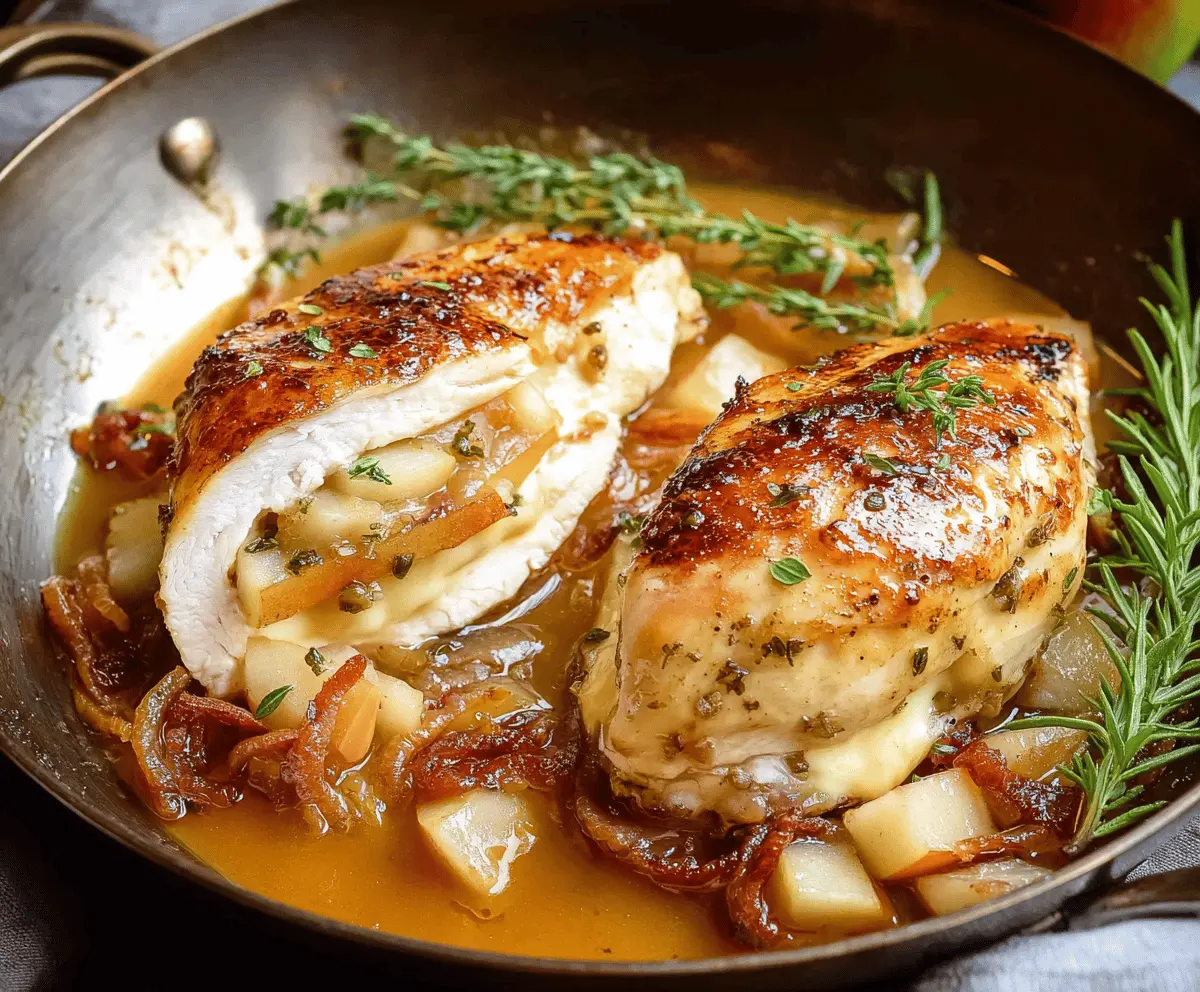
This Maple Glazed Apple and Brie Stuffed Chicken is a wonderful mix of sweet and creamy flavors wrapped in tender chicken breast. The juicy apples and soft brie cheese inside make every bite a little surprise, while the maple glaze on top adds a shiny, sweet finish that’s hard to resist.
I love making this recipe when I want something a bit special but still simple to prepare. The combination of the warm apples and melty brie reminds me of cozy fall evenings. I usually take my time glazing the chicken slowly so the maple syrup gets just right—a tip that really makes the flavors pop.
One of my favorite ways to serve this dish is alongside roasted veggies or a fresh green salad to balance the sweetness. It always impresses guests and feels like a treat without being fussy. Whenever I make it, I enjoy how the sweet and creamy filling pairs perfectly with the savory chicken—it’s like a little moment of joy on the plate!
Key Ingredients & Substitutions
Chicken Breasts: Using boneless, skin-on chicken keeps the meat juicy and adds flavor from the crispy skin. If you prefer, skinless chicken works too, but the dish may be less moist.
Apples: Honeycrisp and Granny Smith are great for their balance of sweet and tart. You can swap with Fuji or Gala apples, keeping their firmness for stuffing.
Brie Cheese: Brie melts beautifully and adds creaminess. If unavailable, try Camembert or even mozzarella for a milder option.
Maple Syrup: Pure maple syrup gives a rich, natural sweetness. If you don’t have it, honey or a light brown sugar glaze can work in a pinch.
Yellow Onion: This onion caramelizes nicely for sweetness. Shallots or white onions can be used but watch the cooking time to avoid burning.
How Can I Perfectly Stuff and Cook the Chicken Without Losing the Filling?
Stuffing chicken can be tricky because the filling tends to fall out during cooking. Here’s how to keep it neat and tasty:
- Use a sharp knife to cut a clean pocket, slicing wide but not through the whole breast.
- Don’t overfill—just enough apple and brie to fit comfortably inside without bursting.
- Secure the opening with toothpicks before seasoning and cooking—this helps keep everything inside.
- Start by searing skin side down to crisp the skin and “seal” the pocket edges a bit, which holds the filling better.
- Finish cooking in the oven to ensure even heat without burning the outside.
- Let the chicken rest after baking; this helps juices redistribute and keeps the filling from oozing out immediately.
Equipment You’ll Need
- Oven-safe skillet – perfect for searing the chicken and then finishing it in the oven without extra dishes.
- Sharp knife – helps you cut a clean pocket in the chicken breast for easy stuffing.
- Cutting board – a sturdy surface to safely slice apples and prep your chicken.
- Toothpicks – essential for keeping the stuffed chicken pockets closed while cooking.
- Meat thermometer – helps you check the chicken’s internal temperature for safe, juicy results.
Flavor Variations & Add-Ins
- Swap brie for goat cheese for a tangier flavor that pairs well with the sweet apple and maple glaze.
- Add cooked bacon bits inside the pocket for a smoky crunch that adds depth to each bite.
- Use pears instead of apples for a softer texture and a slightly different sweetness profile.
- Stir in chopped fresh sage with the onions to give the dish an earthy, herbaceous twist.
Maple Glazed Apple and Brie Stuffed Chicken
Ingredients You’ll Need:
For the Chicken and Stuffing:
- 4 boneless, skin-on chicken breasts
- 1 medium apple (Honeycrisp or Granny Smith), peeled, cored, and sliced
- 4 oz Brie cheese, sliced
- Salt and freshly ground black pepper, to taste
For Cooking and Glaze:
- 1 tablespoon olive oil
- 1/2 cup finely sliced yellow onion
- 2 tablespoons butter
- 1/4 cup pure maple syrup
- 1/2 teaspoon dried thyme or 1 teaspoon fresh thyme leaves
For Garnish:
- Fresh rosemary sprigs
- Fresh parsley, finely chopped
Time Estimate:
You’ll need about 10 minutes to prep the chicken and filling, 15 minutes to sear the chicken and sauté onions, plus 15-20 minutes baking time. Resting the chicken for 5 minutes at the end is important too. Total time: around 45 minutes.
Step-by-Step Instructions:
1. Prepare Chicken Pockets and Stuffing:
Preheat your oven to 375°F (190°C). Using a sharp knife, carefully cut a horizontal pocket into each chicken breast, being careful not to cut all the way through. Stuff the pockets with apple slices and Brie cheese. If needed, use toothpicks to close the openings so the filling stays inside. Season both sides of the chicken with salt and pepper.
2. Sear Chicken and Cook Onions:
Heat olive oil in a large oven-safe skillet over medium-high heat. When hot, add the chicken breasts skin side down. Cook for about 5 minutes until golden brown, then flip and cook the other side for 3 minutes. Remove the chicken and set aside. Reduce heat to medium and add butter to the pan. When melted, add the sliced onions and cook for 8-10 minutes, stirring occasionally, until the onions are soft and caramelized.
3. Make Maple Glaze and Bake:
Add maple syrup and thyme to the onions and stir to combine, scraping up any flavorful bits from the pan. Return the chicken breasts to the skillet and spoon some glaze mixture on top. Transfer the skillet to the oven and bake the chicken for 15-20 minutes, or until the internal temperature reaches 165°F (74°C).
4. Finish and Serve:
Remove the skillet from the oven and rest the chicken for 5 minutes. Plate the chicken breasts and spoon the maple-glazed onion and apple sauce over the top. Garnish with fresh rosemary sprigs and chopped parsley before serving.
Serve with roasted vegetables or a crisp green salad for a delicious, elegant meal everyone will love!
Can I Use Frozen Chicken for This Recipe?
Yes, you can! Just make sure the chicken breasts are fully thawed before stuffing and cooking. Thaw them overnight in the fridge or use a cold water bath for quicker thawing. Pat them dry before slicing pockets to avoid extra moisture.
What Can I Substitute for Brie Cheese?
If you don’t have Brie, Camembert or goat cheese work well as creamy alternatives. For a milder option, mozzarella is also great—it won’t have the same rich flavor but will still melt nicely inside the chicken pockets.
How Do I Store Leftovers?
Store any leftovers in an airtight container in the refrigerator for up to 3 days. To reheat, gently warm the chicken in a skillet over low heat or in the microwave, adding a splash of broth or water if the sauce seems dry.
Can I Make This Ahead of Time?
Absolutely! Stuff and season the chicken breasts ahead of time, then cover and refrigerate for up to 24 hours. When ready to cook, follow the searing and baking steps as usual for fresh, flavorful results.