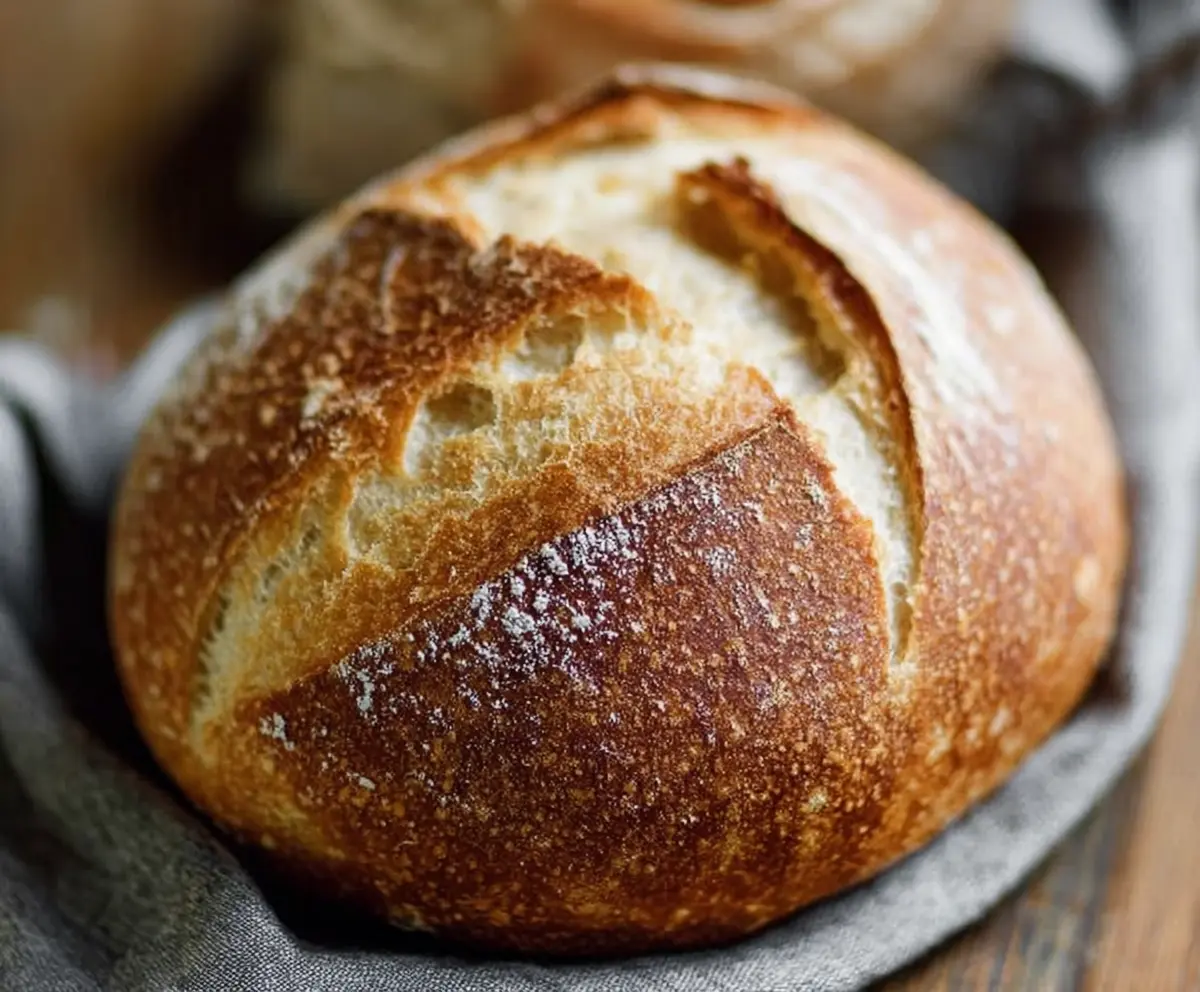
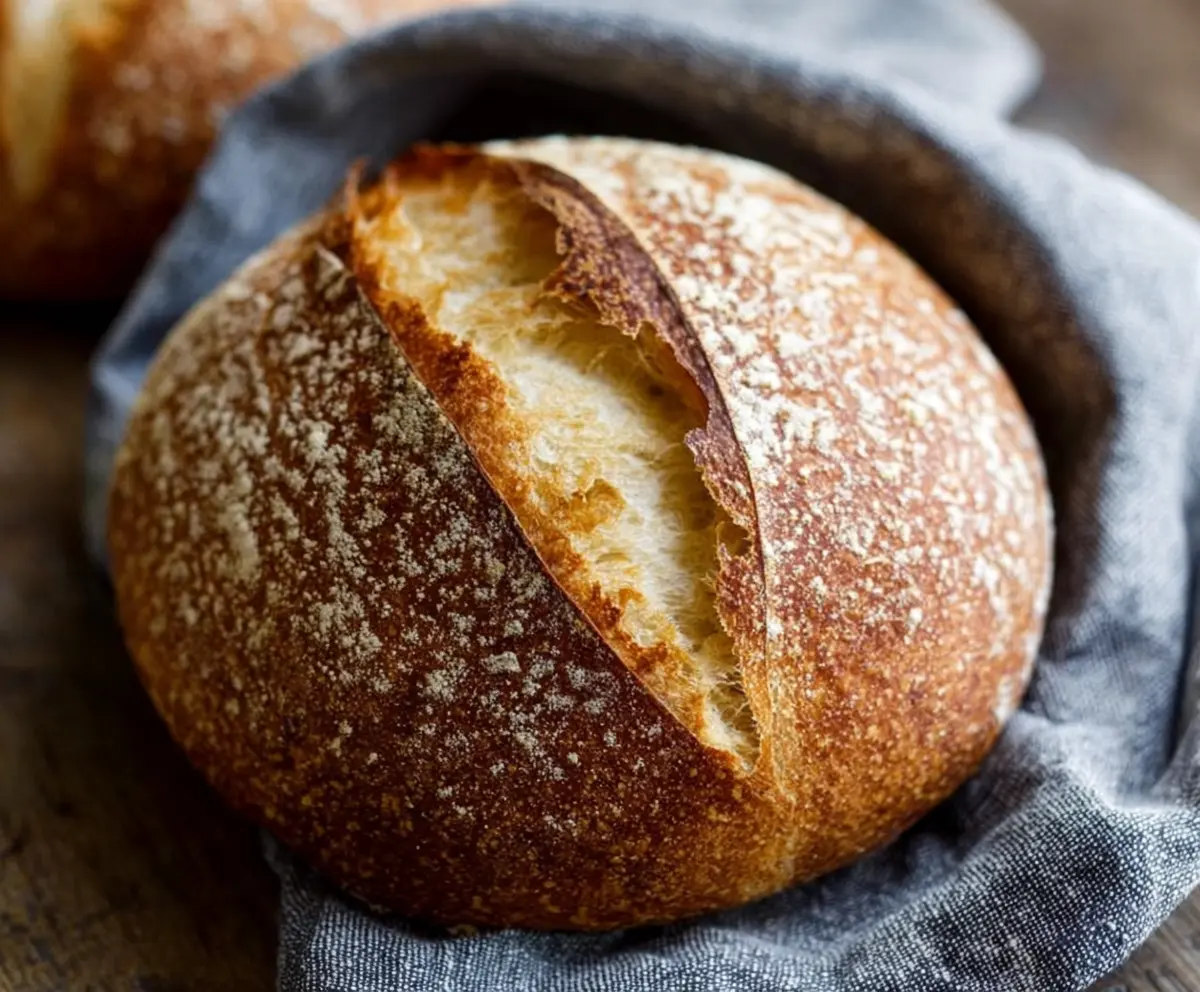
There’s nothing quite like homemade sourdough bread—the crispy crust, the chewy crumb, and that tangy flavor that fills your kitchen with the smell of fresh baking. This is my Best Ever Sourdough Bread Recipe, and I think you’re going to love how simple it makes turning flour and water into a beautiful, crusty loaf. Step-by-step instructions guide you through every part of the process, so you won’t get stuck or overwhelmed.
I’ve made sourdough bread plenty of times, and this recipe is the one I keep coming back to because it feels both honest and doable. I like to let the dough rest when it should and not rush anything. Patience really pays off here—the longer you wait, the better the flavor and texture. Plus, the hands-on process is a little like therapy, and nothing beats that moment when you pull your golden loaf out of the oven.
My favorite way to enjoy this bread is fresh, right after it cools—spread thick with butter or your favorite jam, or even toasted with some garlic and olive oil. It’s perfect for any meal of the day and makes sandwiches taste extra special. If you ever find yourself craving fresh sourdough but don’t want to leave the house, this recipe is your new best friend.
Key Ingredients & Substitutions
Bread Flour: This gives your bread that strong structure and chewy texture thanks to its high protein. If you can’t find bread flour, all-purpose flour works fine, but the crumb might be softer.
Water: Lukewarm water helps activate your starter without killing the natural yeast. If your tap water is hard or chlorinated, try filtered water for better results.
Sourdough Starter: Your starter is the heart of this recipe. It should be well-fed and bubbly for a good rise. If you don’t have a starter yet, you can make one ahead or buy a live culture online or from a friend.
Salt: Salt controls fermentation and adds flavor. Fine sea salt or kosher salt is best. Avoid iodized table salt, as it can affect the yeast activity and flavor.
How Do I Perfectly Do the Stretch and Folds Without Making a Mess?
Stretch and folds develop gluten and give your dough strength without heavy kneading. Here’s how I keep it neat:
- Wet your hands with water to stop the dough from sticking.
- Gently grab one edge of the dough, stretch it upward without tearing, then fold it toward the center.
- Turn the bowl to work on all four sides.
- Let the dough rest between folds; it relaxes and becomes easier to handle.
This technique takes practice, but it makes the dough stronger and gives you that open crumb and chewy texture. Just be patient and gentle—you’ll get better each time.
Equipment You’ll Need
- Large mixing bowl – big enough to hold sticky dough and let it rise comfortably.
- Dutch oven or heavy oven-safe pot with lid – traps steam to create a crispy crust.
- Banneton basket or bowl lined with a floured towel – helps your dough keep its shape during the final proof.
- Bench scraper – handy for folding and shaping sticky dough without mess.
- Sharp blade or serrated knife – perfect for scoring the dough to control expansion when baking.
Flavor Variations & Add-Ins
- Add a handful of chopped olives or rosemary to the dough for a savory twist that pairs well with cheese.
- Mix in some toasted nuts or seeds like sunflower or pumpkin for added crunch and nutty flavor.
- Swap part of the bread flour for whole wheat for a heartier loaf with more depth and nutrition.
- Try stirring in fresh herbs or garlic powder when mixing for an herby or garlicky sourdough.
Best Ever Sourdough Bread Recipe (Step-by-Step)
Ingredients You’ll Need:
- 500g (about 4 cups) bread flour (or a mix of bread and all-purpose flour)
- 350g (about 1 1/2 cups) water, lukewarm (about 75°F/24°C)
- 100g (about 1/2 cup) active sourdough starter (fed and bubbly)
- 10g (about 2 teaspoons) fine sea salt or kosher salt
How Much Time Will You Need?
This recipe takes roughly 4 to 6 hours of active and rest time spread throughout the day, plus an overnight proof for 12 to 18 hours in the fridge. The timing depends on room temperature and starter activity. The hands-on mixing and shaping take about 30 minutes total, with automatic rests and rising giving your dough time to develop flavor and texture.
Step-by-Step Instructions:
1. Mixing the Dough:
In a large bowl, whisk together the flour and lukewarm water until all the flour is hydrated with no dry bits. Cover it loosely and let it rest for 30 minutes up to 1 hour. This autolyse process helps the flour absorb water and starts gluten development with no kneading.
2. Adding the Starter and Salt:
Stir in your active sourdough starter and salt until fully combined. The dough will still be sticky and rough. This step brings the yeast and flavor into the mixture.
3. Bulk Fermentation with Stretch and Folds:
Cover the dough and every 30 minutes for the next 3 to 4 hours, perform stretch and folds to strengthen the dough. Wet your hands to avoid sticking, gently stretch one side of the dough up and fold it toward the center. Repeat this on all four sides of the dough. The dough will gradually become smoother and more elastic.
4. Rising Until Nearly Doubled:
After the last fold, cover the bowl tightly and let the dough rise at room temperature until almost doubled. Depending on ambient temperature, this can take anywhere from 2 to 4 hours.
5. Shaping the Loaf:
Lightly flour your work surface and gently turn the dough out. Shape it into a tight round loaf (boule) by folding edges into the center, then use your hands to build tension by pulling the dough underneath itself. A bench scraper can help you handle the sticky dough.
6. Final Proof in the Fridge:
Place the shaped dough, seam side up, into a floured banneton or bowl lined with a heavily floured kitchen towel. Cover it and refrigerate for 12 to 18 hours. This slow proof improves flavor and makes scoring easier.
7. Preheat Your Oven and Dutch Oven:
About 30 minutes before baking, place a Dutch oven or heavy pot with a lid into your oven and preheat the oven to 475°F (245°C). This gets your baking vessel hot enough for a great oven spring.
8. Score and Bake:
Carefully remove the Dutch oven from your oven. Turn the dough out seam-side down onto a piece of parchment paper. Use a sharp blade or serrated knife to score the surface, then lift the dough by the parchment and place it into the Dutch oven. Cover with the lid and bake for 20 minutes.
9. Bake Uncovered:
Take off the lid and bake the bread for an additional 20 to 25 minutes until the crust is a deep golden brown with a crispy texture.
10. Cool Before Slicing:
Remove your bread and transfer it to a wire rack. Let it cool for at least one hour to let the crumb set properly. Then slice and enjoy!
Can I Use All-Purpose Flour Instead of Bread Flour?
Yes! All-purpose flour works fine if you don’t have bread flour, though the crumb might be slightly softer and less chewy. You can also mix them to get a balance.
How Do I Know When My Sourdough Starter Is Ready to Use?
Your starter should be bubbly and double in size within 4 to 6 hours of feeding. A simple float test—dropping a spoonful into water to see if it floats—can also indicate it’s active and ready.
Can I Skip the Overnight Refrigeration Step?
You can, but the cold final proof really improves flavor and makes scoring easier. If short on time, you can proof at room temperature until doubled, but the bread may be less complex in taste.
How Should I Store Leftover Sourdough Bread?
Keep it wrapped in a paper bag or bread box at room temperature to retain the crust’s crunch for 2 to 3 days. For longer storage, slice and freeze it in airtight bags, then toast or thaw as needed.